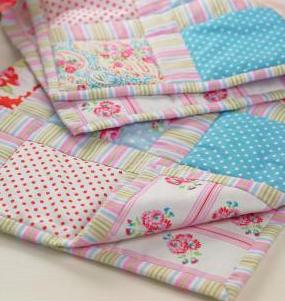
Baby cuddles
Our delightful quilt and cushion set makes the perfect gift to celebrate a new bundle of joy! Wrap your precious little tots in this beautiful baby blanket designed by talented, Corinne Bradd. Easy to reproduce for even the most novice of stitchers, it’s built up with squares of floral and patterned fabrics in cheerful soft pastel shades. Perfect for the cot, pram or as a play mat, this is the ideal gift to sew for a new mum, granny or even yourself.
 What you need:
Fabrics, cotton: strip, white; fat quarters,
Paisley Blue, LuLu Rose
Red, Dots White, Dots
Blue, Buds Blue, Spring
Blue, Stripes Green,
Posy Pink, Delilah, Tanya
Whelan
Wadding, quilt, lightweight, 100cm square
Zip, 30cm
Thread, embroidery
1 Cut 25 pieces of cotton, each 12.5cm square. Before this, decide on the arrangement of the different fabrics by sketching a rough layout. This way you will know how many squares of each fabric you will need to cut. Use striped fabric, 80cm x 100cm, as an infill between the patterned fabrics. Trim some of it into strips 5cm wide (you will need 11).
2 Select the five squares that will form the top row of the quilt and a strip of striped fabric. Lay the strip face down against the righthand side of the first square and pin in place. Trim the strip to 12.5cm and open out. Pin the second square, face down, to the left side of the strip and open out. Repeat these steps until all five squares are pinned to infill strips. Make up the remaining four rows of squares in the same way.
3 Machine stitch along each pinned line, 5mm from the edges of the fabric. Remove the pins and press all the seams open. Each joined strip should be 74.5cm long at this point. Lay the first joined strip flat and pin a length of striped fabric face down to the lower edge. Open out and pin the next joined strip to the other edge of this in the same way as before.
4 Start pinning from the centre of the joined strip, this method ensures that the squares will line up more accurately from side to side and any discrepancies in your seam allowance will be evened out across the length. Continue pinning infill and joined strips in this way. Machine stitch along each pinned line with a 5mm seam allowance. Remove the pins and press the seams open.
5 Measure the entire patchwork square (should be 74.5cm both ways) and cut a piece of quilt wadding and the striped backing fabric to the same size. Place the backing fabric face down on a flat surface, place the wadding on top and lay the patchwork piece face up over this. Pin the three layers together, starting from the centre and working outwards, smoothing the fabric as you go to prevent it ruching.
6 Machine stitch along all the lines where the different fabrics meet. Start with the central lines in both directions and work outwards. Try to stitch directly over the joins in the fabric so the stitchingis virtually hidden. Retrim the edges of the wadding and the backing fabric, if necessary. Pin strips of striped fabric face down around the edges of the quilt. Ensure the pieces overlap the corners of the quilt by 3cm.
7 Machine stitch 5mm from the edge, avoid going right up to the corners. Fold the strips out and press. Fold under 5mm on the un-stitched edge and press. Fold the strips to the back of the quilt and pin, mitring the corners as you do this. Hand sew the pressed fold to the backing fabric with slip stitch.
Cushion
1 Create a patchwork panel in the same way as for the quilt but add the border strips to the square before you begin to quilt. You will need to cut nine 8.5cm squares of patterned fabric and three lengths of stripy material 3.5cm wide. Press the resulting patchwork panel and measure, it should be around 33.5cm square.
2 Take plain white fabric and cut a square the same size as the patchwork panel. Place on a flat surface and lay the leftover wadding on top. It doesn’t matter if you have to use two strips of wadding side by side as long as the pieces butt up nicely and don’t leave a gap. Trim the edges to the same size as the white square before placing the patchwork on top. Pin the layers together and machine stitch the quilt.
3 Add a further line of stitching around the border of the design. Use the remaining backing fabric for the cushion reverse. Ensure you have two pieces of material the same width as the quilted panel and half the depth plus 2.5cm extra. Press under the spare 2.5cm on each piece and place them face down on a flat surface, folded edges butted up to each other. Lay a zip, face down over the join and pin in place. Stitch it to the fabric using a zipper foot on the machine.
4 Open the zip by 5cm and place the cushion back face up on a flat surface. Lay the quilt panel face down on top and pin around the edges. Machine stitch the two together with a 1cm seam allowance and use the gap in the opened zip to turn the cushion cover right sides out. Add a personalised panel by backstitching a name and date onto a plain white cotton rectangle with coordinating embroidery thread. Fold under the edges and press. Pin and sew the panel to the cushion cover or the quilt.
This pattern has been kindly donated by Let’s Knit magazine, visit www.letsknit.co.uk for more patterns. Thanks also to Corinne Bradd for designing this pattern. Corinne is a multi-talented and award-winning designer who regularly creates projects for Let’s Get Crafting, Sew, Let’s Knit, Make Jewellery and Crafts Beautiful.

![]()

Leave a Reply
Please login or register to leave a comment.