Birdie Song
Skill level: 2
Technique: Sewing, cross stitch
Stitch Corinne Bradd’s Vintage-style jewellery with fabric and buttons
Bird motifs are one of this season’s hottest fashion stories, with fabric prints and many celebrities seen wearing delicate designs as pendants. This cute folksy set was created by cutting birds from printed cotton fabrics using Sizzix dies then stitching them onto denim and cross stitch backgrounds. Cute heart buttons and ribbon ruffles add the perfect finishing touch!
Ingredients:
Beads
– Seed beads, white
– Buttons: Heart in Pink and Red
Findings
Aida, 14hpi, white
Fabric scraps: denim, light blue, dark blue; cotton print, three different types
Webbing, fusible
Ribbon: thin, red; grosgrain, wide
Threads, embroidery: pale pink; dark pink; pale blue
Snap fasteners, 11mm, silver
Cover button, 4cm diameter
Ring blank, flat pad
Brooch back or large safety pin
Felt
Tools
Big Shot, Sizzix
Big Shot dies, Sizzix: Oval frame, bird and pendant (#657019); Bird, flower and leaf (#657008)
Adhesive, G-S Hypo
Cement
Card, thick
Hammer
Setting tool, Fashion Snaps
Brooch
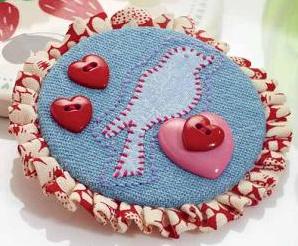
1 Die cut a large bird motif from light blue patterned fabric using a Sizzix #657019 die. Back the
shape with fusible webbing and bond onto an 8cm square of light blue denim. Oversew the outline of
the bird with three strands of dark pink embroidery thread, then back stitch around the motif with
pale blue yarn.
2 Cut the square into a circle and trace around a 5cm disc of thick card on the reverse. Use this line as a guide for positioning several small heart buttons on the front of the denim. Sew running stitch around the circumference of the denim circle, place the cardboard disc back in place and pull the stitching tight around it, fastening off securely.
3 Cut a strip of coordinating cotton print fabric 2cm wide x 40cm long, joining pieces if necessary to achieve the measurement. Fold the strip in half along the length and sew the raw edges to the back of the denim-covered disc, gathering the fabric as you go along to create a tidyrosette appearance.
4 Cut a 5cm diameter circle of felt and oversew to the back of the brooch to cover all of the raw edges. Stitch or glue a brooch back or large safety pin to the reverse, placing it top centre so that the brooch does not ‘flop’ down when being worn.
Wristband
1 Iron fusible webbing to the back of some blue cotton print scraps and use a Sizzix #657019 die to cut an oval frame from one piece. Bond the frame to a 6cm x 9cm rectangle of white aida.
2 Cut two bird shapes from a different print fabric with the same die, placing one piece face up and the other face down when cutting so that the birds are a mirror image. Bond these to the frame and aida. Use three strands of dark pink embroidery thread to cross stitch a heart between the two birds and fill in the rest of the background with light pink stitching.
3 Secure the frame to the aida with small running stitch and oversew the outlines of the birds with pale blue thread. Back the aida with fusible webbing before trimming away the excess from around the frame. Bond the stitched motif to the centre of the denim rectangle and oversew around the edges to secure.
4 Cut two more bird motifs using die #657008 and fix them to either side of the main motif, oversewing around the edges to secure. Fold in and press under the long edges of the denim to make a band 6cm wide. Measure comfortably around your wrist and add 2cm to this figure. Fold under and press the short edges of the denim to this length, mitring the corners neatly.
5 Pin the folds and lay a length of wide grosgrain ribbon over the back. Oversew the ribbon to completely enclose the raw edges and remove the pins. Use a hammer and setting tool to fix snap
fasteners at the corners of the wristband to fasten; illustrated instructions can be found on p80.
Ring
1 Die cut a small bird motif from pale blue fabric with a Sizzix #657008 die, then back with fusible webbing and iron onto an 8cm square of dark blue denim. Oversew in place with three strands of dark pink embroidery thread.
2 Cut the square into a circle and position a 4cm round cover button in the centre on the back. Draw around this then remove and use the line as a guide for positioning two small heart buttons on the front of the design.
3 Sew running stitch all around the circumference of the denim, place the button in the centre of the circle and pull the stitching tight around it to cover. Fasten off securely. Stitch the edge of the button
with a continuous line of white seed beads and sew ruffled thin red ribbon behind this. Neaten the back of the button with a small circle of fabric sewn in place.
4 Apply a generous dollop of G-S Hypo Cement to the centre back of the covered button. Allow the adhesive to go slightly tacky before pressing a flat pad ring blank firmly onto it. If you can, keep a steady pressure on the ring blank while the glue is drying. If not, make sure the piece is kept flat and undisturbed until dry.
![]()
docrafts® are responsible for the UK’s leading crafting website www.docrafts.com and Creativity Magazine. They pride themselves on providing an abundance of inspiration, tips, techniques and know-how, covering a wide range of crafts, to enthusiasts across the World. Many of the UK’s leading products and recognized brands such as Papermania, Xcut, Forever Friends™, Me to You™, Boofle™, Anita’s, Craft Planet and Cousin Jewellery come under the docrafts® umbrella.

Comments:
There are currently no comments for this article, be the first by using the box below.
Post Your Comment
You must be logged in to submit a comment.
Share this page

Leave a Reply
Please login or register to leave a comment.