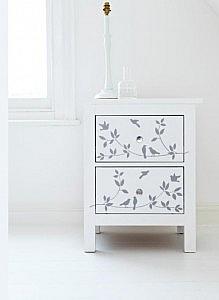
Cabinet reshuffle
Let your creative side run wild and turn a boring bedside cabinet into a work of art.
Download your cabinet template.
Transform a plain piece of wooden furniture into an eye-catching focal point with a lick of paint and an attractive design to give it a personal and individual look.
For a smart, contemporary effect we chose a pale, neutral colour for the background and a darker neutral for the design. Take your pick from the huge range of knobs available in DIY stores – we opted for simple, modern silver ones to complement the overall look – and it’s all doable in a weekend.
You will need:
- Cabinet
- Screwdriver
- Medium-grade sandpaper
- Cloth
- Masking tape
- Primer undercoat
- Large and medium decorating brushes
- Quick-dry satinwood or eggshell paint
- Matt emulsion to match the satinwood
- Tracing paper
- Pencil
- Artists’ brushes in various sizes
- Artists’ acrylics or sample pots of paint
- Quick-dry clear varnish
Step by Step:
1. Remove the old knobs and pull out the drawers. Lightly sand all surfaces, including the fronts of the drawers, then wipe off any dust. Stick masking tape on the sides of the drawers to prevent marking them with paint.
2. Apply primer with a large decorating brush to the body and drawers, painting evenly in the direction of the wood grain. If the paint looks patchy, apply a second coat, allowing two hours’ drying time between each coat.
3. Apply two coats of satinwood or eggshell paint to the body of the bedside cabinet (but not the fronts of the drawers), allowing six hours drying time between coats. Paint one coat of matching matt emulsion on the drawer fronts.
4. Download the cabinet template or reduce (or create your own design) so that it fits the size of the drawers. Transfer on to tracing paper then pencil over the reverse. Secure the tracing paper with tape to the drawer fronts, with the design the right way round, then pencil over the lines to transfer the design on to the drawers and body. Remove the tracing paper.
5. Use fine artists’ brushes to paint the design on the drawer fronts, not forgetting the stems that continue on to the body of the cabinet. Use artists’ acrylics or sample pots of emulsion. Don’t overload the brush as you don’t want the pattern to run.
6. After a few hours drying time, use a medium brush to apply two coats of varnish to the drawer fronts to protect them from damage (allow time to dry after each coat). Use an artists’ brush to varnish the painted stems. Fit the new drawer knobs.
This project is taken from Craft, published by Dorling Kindersley, £25


Leave a Reply
Please login or register to leave a comment.