For a Special Day
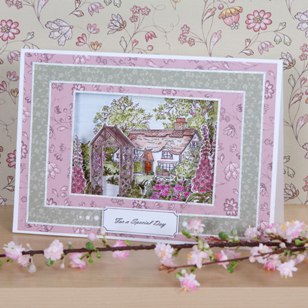
Use the Papermania Gardenia stamps and a clever watercolour technique using the Zig Art and Graphic Twin pens to make a unique 3D country cottage scene for this special card.
You will need ….
PMA 907106 – 5X7 CLEAR STAMPS – GARDENIA
VAM 160100 – 8X8 LINEN PAPER PACK 120GSM – V&A HANOVERIAN (24PK)
PMA 7096 – ADHESIVE PEARLS – WHITE
ANT 8181014 – GLITTERATIONS – BORDERS – WHITE
ANT 1514020 – A5 CARD/ENVELOPE 25 PACK – WHITE
CSP 72010 – ANCIENT PAGE COAL
ZIG 96315 – ZIG ART & GRAPHIC TWIN (MUTED) WALLET OF 12 ASST (TUT80/V12)
ZIG 96316 – ZIG ART & GRAPHIC TWIN (BRIGHTS) WALLET OF 12 ASST (TUT80/V12)
XCU 2551000 – NO 1 KNIFE WITH KUSHGRIP
ZIG 94803 – WATERCOLOUR SYSTEM BRUSH2O DETAILER (WSBR01)
XCU 258202 – EXTENSION PUNCH – 4MM CIRCLE
PMA 8520004 – GEL PENS – JET BLACK – 2 PACK
Level: Intermediate
Duration: 45 minutes
Step by Steps:
1. Cover an A5 card blank with pink patterned paper. Cut an 11.5 x 8cm aperture centrally from the card.
2. Stamp the cottage scene onto white cardstock, and trim to measure 12 x 14.5cm. Also stamp the gate trellis, foxgloves and rosebush and cut out. Colour with Zig art and graphic twin markers and a waterbrush.
3. Cut two pieces of white cardstock measuring 4 x 12cm. Score along the length at 1cm intervals so the card is split into 4 sections. Fold like a concertina to form a ‘W’shape. Fix to the left and right edges of the stamped image, and stick to the underside of the cardstock so that the image can be seen through the aperture.
4. Fix the trellis and flowers to the underside of the aperture, but directly onto the card blank, creating a 3D scene. Use 3D foam pads on the rosebush for even greater depth.
5. Trim green patterned paper to measure 18.5 x 12.5 cm, and cut an aperture, leaving a 1.5cm border. Fix this to the card blank as shown. Add glitterations borders around the aperture and patterned paper frame.
6. Stamp a greeting onto white cardstock and trim to 6 x 2cm. Punch half circles from each corner using the 4mm extension circle punch. Use a black fine line pen to frame the greeting, and fix into place using 3D foam pads.
7. Finally add white adhesive pearls to the left and right of the greeting panel to finish.
Designer – Clare Curd
For information about where you can buy the items needed, please visit www.docrafts.com

Leave a Reply
Please login or register to leave a comment.