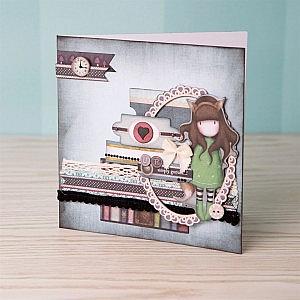
Gorjuss Wishes
With such gorgeous papers try to leave a little ‘white space’ to let the detail shine out! Mix and match elements from the different Gorjuss collections for an eclectic look to your projects.
By Rebecca James
Level: Beginner
Duration: 45 minutes
 You Will Need
GOR 150602 6 x 6″ Cards & Envelopes (12pk) – Simply Gorjuss
GOR 160107 A4 Ultimate Die-cut & Paper Pack (48pk) – Simply Gorjuss
GOR 169103 Mini Decoupage Simply Gorjuss – Ladybird
GOR 367102 1m Ribbon (6pcs) – Simply Gorjuss
GOR 367103 Ribbon Trim Bows (12pcs) – Simply Gorjuss
GOR 367203 1m Trims (3pcs) – Simply Gorjuss
PMA 354030 Polka Dot Buttons (30pcs) – Capsule Collection – Oyster Blush
DOA 550205 Dye Ink Pads – Black
PMA 169207 A4 Stamp Pad Foam
PMA 351401 Adhesive Stones (104pcs) – Solid Black
PMA 907187 Tall Urban Stamps – Mini Typewriter Alphabet
Step by Step
1. Blend black ink around the perimeter of a blue printed Gorjuss 6×6” card. From this point blend the ink round the other paper elements used in the design to tie everything together.
2. Place the book spine die cut topper centrally, just up from the bottom of the card blank. Add the ticket topper about a centimetre above this just right of centre.
3. Layer Gorjuss crochet & pompom trims & teal Gorjuss ribbon across the front of the card so that sits towards the top of the book spine topper. Attach the dotty die cut paper border on top of the teal border.
4. Add the border from the Ladybird mini decoupage pack to the right side of the card. Shape the foxy girl character and place her to the right of the frame covering the visible card blank beneath.
5. Place the teal and gold striped topper just above the crochet trim, so that it overlaps the frame and place the file label style topper just above.
6. Stamp the letters U and R onto grey card and add along with the die cut sentiment as shown.
7. Add the heart to a die cut red circle and place in the centre of the frame on the file. Add the canvas above the greeting and balance with an Oyster Blush polka dot button to the right of the characters boots.
8. Create two pennant style toppers using the spotty die cut border step 3 and the toadstool topper. Add a clock, overlapping them.
9. Finish with a sprinkling of black gems.
 docrafts® are responsible for the UK’s leading crafting website www.docrafts.com and Creativity Magazine. They pride themselves on providing an abundance of inspiration, tips, techniques and know-how, covering a wide range of crafts, to enthusiasts across the World. Many of the UK’s leading products and recognized brands such as Papermania, Xcut, Forever Friends™, Me to You™, Boofle™, Anita’s, Craft Planet and Cousin Jewellery come under the docrafts® umbrella.

Leave a Reply
Please login or register to leave a comment.