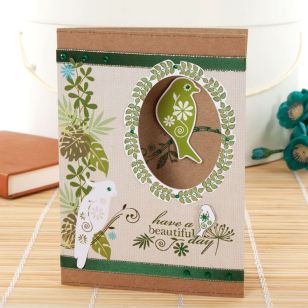
Have a Beautiful Day Card
The stunning Papermania Birdsong collection is ideal for every occasion.
You will need…
PMA 160105 6X6 PAPER PACK (50PK) – BIRDSONG
PMA 803101 CARDSTOCK STICKERS – TROPICAL FLOURISH (2PK)
PMA 907103 5X7 CLEAR STAMPS – BLOSSOM TREE
ANT 3679100 HOT PICKS – 3M RIBBON – CHRISTMAS
CSP 01023 COLORBOX HIGH TOP EVERGREEN
PMA 150632 5×7 CARD BLANKS 300GSM (50PK) – RECYCLED (KRAFT)
PMA 351102 ADHESIVE STONES – GREEN
PMA 8511003 BRUSH MARKER 12 PACK – VINTAGE COLLECTION
PMA 8710 12×12 CARDSTOCK 240GSM 20 SHEETS WHITE
PMA 9031001 CLEAR STAMP BLOCK – 4 X 5.25IN
XCU 2701603 NESTING PUNCH – ELLIPSE (3 Inch)
Level: Intermediate
Duration: 45 minutes
Step by Step:
1 Position the Bird Song patterned paper onto a 7×5″ Kraft Card, with the design on the left. Trim away excess paper. Open out the card and cut around the top leaf and bird’s tail with a craft knife. Cover the joins where the paper meets the card with ribbon, positioning the top leaf and bird’s tail over the ribbon.
2 Punch an Ellipse in the card to the top right.
3 Position the sentiment on an acrylic block. Ink it up in green ink and stamp below the aperture. Add a leaf to the bottom left. Stamp a small bird onto white card and cut out. Layer with Stick It! foam dots to the top right of the greeting.
4 On more spare white card, punch the ellipse again and repeatedly stamp the leaves around the oval. Colour the leaves and cut out to create a frame.
5 Stick around the aperture.
6 Stamp a twig onto the back inside of the card, so that it is visible through the aperture.
7 Apply the bird cardstock sticker to white card and cut out leaving a slight white edge showing. Layer with Stick It! foam dots in position on the back inside of the card to appear as if it is sitting on the twig and can be seen through the oval aperture.
8 Apply green adhesive stones to the twig, bird’s eye, around the leaf frame, cockatiel eye, mini bird’s wing and three in a row on the ribbon to the top left and bottom right, as well as a gemstone to the centre of the flower below the greeting.
9 Draw a dashed/ dot green line across the top and bottom of the card to finish.
Designer – Jenny Pearce
For information about where you can buy the items needed click here

Leave a Reply
Please login or register to leave a comment.