Merry Christmas Cracker Card
By Sarah Jackman Read
Have fun with the Xcut Dies to add 3D elements to you paper crafting.
 Step By Step
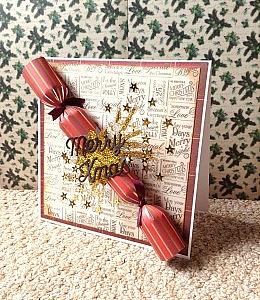
1. Matt tartan paper on to the front of an 8 x 8″ card blank. Ink the edges of greetings paper and matt on top of the tartan.
2. Die cut a cracker from red stripy paper. Cut some off the width, roll into a tube approximately 1 inch one diameter and tie ends with ribbon. Cut the cracker in half and zig zag the edges to the give the impression it’s been pulled. Cut the ends down to fit of the card and stick in place as shown.
3. Using a paintbrush, draw lines of glue outwards from the centre of the cracker, cover with glitter and leave to dry.
4. Die cut a spiky flower, paint glue over it, add glitter and leave it to dry. Die cut a sentiment in brown cardstock.
5. Cut twenty small strips of acetate and glue gold stars on the ends. Arrange the stars in groups of ten in a fan shape and glue in place.
6. Tuck the gold spiky flower in between the two pieces of cracker and glue in place. Glue the sentiment on top and the gold stars underneath.
7. Finish off with more stars on the card front coming outwards from the centre of the cracker.
You Will Need
Anita’s Tacky Glue (240ml)
Papermania 12 x 12″ Acetate (10pk) – Plain
Papermania 8 x 8″ Cards/Envelopes (6pk, 300gsm) – White
Xcut Nesting Dies (5pcs) – Flower
Papermania A4 Patterned Paper Pack (32pk) – Letter to Santa
Xcut A5 Die Set (14pcs) – Christmas Sentiments
Xcut A4 Dies (1pc) – Cracker Die
Create Christmas Embellishments Pack – Gold
Papermania Fine Glitter (25g) – Gold

Leave a Reply
Please login or register to leave a comment.