Oyster Blush Gift Box
Level: Beginner
Duration: 45 Minutes
By Heather Mitchell
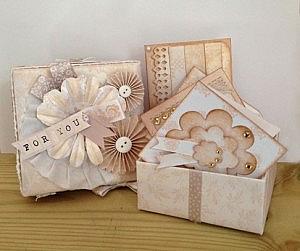
Why not spend an afternoon making someone a lovely gift box decorated with the fabulous Oyster Blush collection? Peek inside the box and you will find four beautifully decorated cards suitable for all occasions!
 Step By Step
- Take a 10x10cm box with a lid and cover it in Oyster Blush papers inside and out.
- Decorate the sides with crochet trim, ribbon and the adhesive crochet border, adding buttons and bows to one side and ribbon loops to the other.
- To decorate the top, take a round notelet and secure a small strip of the pleated fabric trim in a quarter circle to one corner. Attach two pinwheels of different sizes to the edges.
- Cut down two Big Bloomers (of different petal size) so that they are approximately ¾ of the bloomer. Secure ribbon bows and pennants to the centre and finish with a polka dot button. Attach the adhesive letters to a small pennant cut from the left over paper and secure in place.
- To make the cards, cover four 3×3” cards with Oyster Blush paper.
- Card One: Take one card blank and cover with one of the papers. Take another sheet of paper, cut to size, cut a border using the diamonds and dots punch and ink liberally. Trim the edges using a corner punch and attach to the card using 3D foam dots. Cut 3 pennant shapes of different lengths and attach to the top of the card. To finish, secure small pearl adhesive gems to the pennants and two in the left hand corners.
- Card Two: Die-cut three bloom shapes from the paper using the smallest three nesting dies. Ink the edges liberally and secure to the card using 3D foam dots. Under the smallest bloom, secure two small pennants cut from the background paper. Attach three Sunshine adhesive gems to two of the blooms.
- Card Three: Cut a circular round lace paper to fit the card and secure to the card as shown and corner punch the outside edges. Secure a large ribbon bow to the centre of the card. Apply a small strip of the fabric ribbon to the bottom of the card and add three punched flowers. Add pearl adhesive gems to the centre of each flower and to the top right of the card.
- Card Four: Cut a smaller square of paper to fit inside the card and ink the edges. Using the ‘Best Wishes’ sentiment from the Vintage Notes stamps, heat emboss in copper in the centre of the card.
- Attach small strips of the adhesive crochet border to the top and bottom of and add three large Sunshine adhesive gems to the top and bottom.
You Will Need
PMA 16022012 x 12″ Paper Pack (32pk) – Capsule Collection – Oyster Blush
PMA 354030Polka Dot Buttons (30pcs) – Capsule Collection – Oyster Blush
PMA 3582042m Jumbo Crochet Trim – Capsule Collection – Oyster Blush
PMA 3583025m Adhesive Crochet Border – Capsule Collection – Oyster Blush
PMA 3583821m Pleated Fabric Trim – Capsule Collection – Oyster Blush
PMA 359103Pin Wheels (6pcs) – Capsule Collection – Oyster Blush
PMA 3671121m Ribbon (6pcs) – Capsule Collection – Oyster Blush
PMA 367210Large Ribbon Bows (12pcs) – Capsule Collection – Oyster Blush
PMA 368110Big Bloomers (32pcs) – Capsule Collection – Oyster Blush
DOA 550113Pigment Ink Pads – Clear Emboss
DOA 550203Dye Ink Pads – Dark Yellow
DOA 550204Dye Ink Pads – Chocolate
PMA 157224Die-cut Notelets (18pcs) – Capsule Collection – Oyster Blush
PMA 351425Adhesive Pearls (104pcs) – White
PMA 9071616 x 6″ Urban Stamp – Vintage Notes – Sentiments
STI 40013D Foam Dots (152pcs)
XCU 257000Corner Punch 10mm
XCU 261708Medium Palm Punch – Daisy
XCU 503417Nesting Dies (5pcs) – Bloom
 docrafts® are responsible for the UK’s leading crafting website www.docrafts.com and Creativity Magazine. They pride themselves on providing an abundance of inspiration, tips, techniques and know-how, covering a wide range of crafts, to enthusiasts across the World. Many of the UK’s leading products and recognized brands such as Papermania, Xcut, Forever Friends™, Me to You™, Boofle™, Anita’s, Craft Planet and Cousin Jewellery come under the docrafts® umbrella.

Leave a Reply
Please login or register to leave a comment.