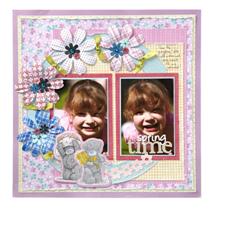
Spring Time Smile
The Me to You Spring Chic collection has a wonderful fresh colour palette and super-cute characters for all your spring projects.
With beautiful pastels and cute characters make the perfect choice for Spring and Easter projects.
Designer: Helen Miles
Level: Beginner
Duration: 1 to 2 hours
You Will Need:
-
 MTY 160106 – 12X12 DOUBLE SIDED PAPER PACK 160GSM (30PK) – SPRING CHIC
 - MTY 803104 – GLITTER CARDSTOCK STICKERS (2PK) – SPRING CHIC (CHARACTERS)
- PMA 181120 – DAISY CHAINS (SELF-ADHESIVE) 12PCS – PARKSTONE PINK
- PMA 354220 – CAPSULE DAISY MINI BUTTONS (30PCS) – PARKSTONE PINK
- PMA 355111 – CAPSULE BLITTERS (50PCS) – BURLEIGH BLUE
- PMA 368100 – CAPSULE BIG BLOOMERS (32PCS) – PARKSTONE PINK
- PMA 368101 – CAPSULE BIG BLOOMERS (32PCS) – BURLEIGH BLUE
- ANT 378506 – 3MTR. RIBBON – GLITTER SATIN – LEMON DROP
- COR 209 – 12×12 CORE CARD WISTERIA
- PMA 803100 – CARDSTOCK STICKERS – CANVAS ALPHABET (2PK)
- PMA 803204 – ALPHAMINI CARDSTOCK STICKERS – CAPSULE (2PK) LIQUORICE SHERBERT (WT)
- PMA 8520004 – GEL PENS – JET BLACK – 2 PACK
Step by Step:
- Trim yellow dot Me to You Spring Chic paper to measure 28x28cm. Glue centrally onto Wisteria Core’dinations cardstock.
- Trim floral paper to measure 27x27cm and distress the edges. Glue centrally.
- Trim pink striped paper to measure 25x20cm. Distress the edges and glue towards the right hand side.
- Trim yellow gingham paper to measure 16x18cm. Distress the edges and glue towards the right hand side as shown.
- Cut a ring of the blue dot paper. Distress the edges and then position towards the left hand side of the page.
- Layer a pair of photos onto blue cardstock and then onto dark pink Paperazzi glitter paper. Position close together on the page as shown. Peel up and shape the flower Daisy Chain around the curve of the ring towards the bottom of the page. Snip into sections to match the curve if necessary.
- Add 4 Papermania Capsule Collection Big Bloomers around the top and left hand side of the ring. Add Blitters and flower buttons to the centre of each Bloomer to decorate.
- Layer a couple of the Me to You cardstock stickers onto pink dot paper and cut out leaving a narrow border. Arrange at the bottom of the ring as shown.
- Tie several knots of ribbon and secure evenly around the ring.
- Add your journalling with a black gel pen to the top right and apply cardstock stickers to the right hand photo to spell out your title.
For information about where you can buy the items needed, click here to visit the docrafts website.
docrafts® are responsible for the UK’s leading crafting website http://www.docrafts.com/ and Creativity Magazine. They pride themselves on providing an abundance of inspiration, tips, techniques and know-how, covering a wide range of crafts, to enthusiasts across the World. Many of the UK’s leading products and recognized brands such as Papermania, Xcut, Forever Friends™, Me to You™, Boofle™, Anita’s, Craft Planet and Cousin Jewellery come under the docrafts® umbrella.


Leave a Reply
Please login or register to leave a comment.