To a Wonderful Friend
The Goody Bag contains a fabulous taster of the hottest new products to hit a craft store new you! Don’t miss out on this great value selection!
Make this whimsical card using the illustrative Tulip collection plus the other great ranges in the Goody Bag!
Level: Advanced
Duration: 45 minutes
Designer: Becky James
You Will Need:
GDY 0511 – GOODY BAG – (MAY 2011)
PMA 274100 – EASY BOW MAKER
ANT 3671212 – 1.5m RIBBON – WIDE ORGANZA – BLUE
CSP 71702 – FLUID CHALK QUEUE ROSE PETALS
PMA 150611 – SQUARE CARD BLANKS 300GSM (50PK) – CREAM
PMA 351305 – ADHESIVE STONES – CAPSULE (120PCS) RED HOT
PMA 353014 – SWEETIES – CAPSULE (21PCS) AQUA
PMA 3681105 – PETALS – CAPSULE (30PCS) BOYSENBERRY
STI 8000 – HOT MELT CORDLESS GLUE GUN (INC 3 GLUE STICKS)
Step by Step
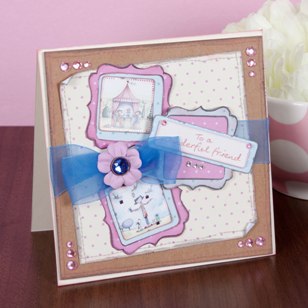
1. Trim Kraft card to 13cm square and cream and pink dotty Me to You paper to 11cm square.
2. For each piece above, using the Soft Grey Fur ink pad from the goody bag stamp a running stitch border using the clear stamp from the Mix and Match – Frames set. Rough up the edges with a nail file or scissors and then ink first with Rouge fluid chalk from the Rose Petals queue and then Soft Grey Fur to define the edges.
3. Attach the polka dot paper to the Kraft card at a slight angle, curling over the top left and bottom right corners of the dotty paper to give a worn effect.
4. Use the Easy Bowmaker and a long length of Anitas blue wide organza ribbon to create a large bow. Adhere the centre of the bow to the card as shown using hot melt glue and secure the ends to the back of the Kraft card. Centre the bow with an Aqua gem sweetie and Boysenberry Petal.
5. To create the three frames stamp the frame from the Mix and Match – Frames stamp twice onto pink dotty Me to You paper and cut out. Ink the frame first with Rouge fluid chalk for dimension and shading and tthen, using the corner of the ink pad, run Soft Grey Fur ink round the edges of the frame for clear definition of the edges. Stick to blue dotty paper and trim round the edge. Repeat with a blue frame and pink dotty background.
6. Choose two square foiled Tulip die cut scenes and ink the edges as in Step 5 for definition. Stick one inside each of the pink frames – they do not need to be centrally placed.
7. Attach a Tulip element sentiment to a die cut background and attach at an angle to the blue framed panel.
8. Place the three framed panels on the front of the card as shown, with the sentiment raised on 3d foam over the ribbon.
9. Finish by attaching Kraft card at a slight angle to the card blank with the spine at the top of the design and adding gem details as in the picture.
For information about where you can buy the items needed click here

Leave a Reply
Please login or register to leave a comment.