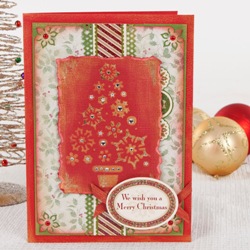
Vintage Spice Card

You will need…
DOA 763104 2OZ Acrylic Paint – Metallic Antique Gold
PMA 1601106 A5 Luxury paper pack (160GSM) Silent Night
PMA 2691900 Steel Stencil 90×110, Silent Night
PMA 4101300 Hot Foil Starter Kit
PMA 4101400 Hot Foil Transfer Tools
PMA 8031108 Glitter Cardstock Stickers – Silent Night
COR 099 12×12 Core Card Scarlet
COR 139 12×12 Core Card Tank
CSP 71702 Fluid Chalk Queue – Rose Petals
PMA 351103 Adhesive Stones Silver
PMA 351208 Shimmering Dots Red
XCU 2571101 2.5cm Corner Punch & Emboss (1PC) Petals – 1 INCH
Where to buy:
For information about where you can buy the items needed click here
Level: Advanced
Duration:1-2 Hours
Step by Step:
1. Cut Two pieces of “Tank” Cardstock – one 6.5 x 4.5 inches and the other 2.25 x 6.5 inches. Punch a diamond border along both sides of the narrower strip.
2. Dry brush metallic gold paint around the edges of a red card blank and the Tank pieces of cardstock.
3. Cut a piece of holly design “Silent Night” paper slightly smaller than the larger piece of Tank cardstock cut in step 1.punch flower design in all the corners, ink the edge using Warm Lipstick from the fluid chalk queue and then dry brush the edges with gold paint as in step 2 to give a gold pearlescent finish to the paper.
4. Adhere the paper to the Tank cardstock, before attaching the entire panel to the front of the card blank. Attach red shimmer dots to the centre of the corner punched flowers.
5. To make the central design for the card cut a piece of “Scarlet” cardstock to 3.5 x 4.5 inches. Using low tack masking tape, attach the steel stencil to the card and brush metallic gold paint through stencil. Allow to dry before removing.
6. Dry brush further gold paint around the edges of the panel and once dry sand to give an aged look.
7. Add a hint of gold foiling by highlighting areas of the tree design using the hot foil pen and allowing the glue to dry clear and tacky. Rub gold foil over the glued areas. Complete the look by also adding silver gem detail on the tree.
8. Complete the panel by ripping each of the edges and curling to give dimension.
9. Attach a glitter cardstock border to the centre of the “Tank” card stock border so that and attach to the centre of the card front.
10. Attach the Scarlet painted panel to the centre of the card blank over the border using 3d foam. Add a Cardstock sentiment to the bottom right of this again using 3d foam.
11. Complete by adding a few cardstock embellishments behind the top right side of the central design as shown.
Designer – Rebecca James

Leave a Reply
Please login or register to leave a comment.